
You can generate a default selection screen, such as screen 1000, with input-ready fields. You use the declarative language elements, PARAMETERS and SELECT-OPTIONS, to do so.
The concrete appearance of the selection screens, supplied by logical databases, is dependent on the specified node name (NODES <name>).
You can create additional selection screens using SELECTION-SCREEN BEGIN OF and call them using CALL SELECTION-SCREEN.
You can create variants to save selection screen values that are used repeatedly. A variant is required if a report with a selection screen runs in the background. It can be recalled for use whenever it is needed.
DECLARING FIELDS WITH PARAMETERS

The PARAMETERS keyword is a declarative language element. Just as in the DATA statement, you can declare parameters with TYPE or LIKE. The input-ready fields on the selection screen are then generated.
The names of the PARAMETERS fields can be up to eight characters long. You can maintain selection texts by choosing theGoto menu and selecting Text Elements → Selection Texts.
Let us look at some options that you can use with the PARAMETERS keyword:
/TAW10_Col92_en_TAW10_-_ABAP_Workbench_Fundamentals/shell/assets/bullet.gif) DEFAULT addition enables you to set values for a PARAMETERS keyword with the addition of a default value. MEMORY ID, when assigned, enables the system to automatically retrieve and display the current value from the SAP memory. OBLIGATORY is an addition where you declare mandatory fields. The user cannot leave the selection screen until entries are made into these fields. VALUE CHECK ensures that entries are checked for validity, but only if there is a reference to a dictionary object that has a foreign key relationship. AS CHECKBOX is a parameter in which you create a one-character field that contains a “ ” (space) or “X”. You can evaluate the contents of the checkboxes in IF/ENDIF structures. RADIOBUTTON GROUP is a group of radio buttons for the selection screen. Only one radio button in a group can be active. You can evaluate the contents of radio buttons, using a CASE/ENDCASE control structure. The selected radio button has the value “X” and all others have the value “ ” (space). MODIF ID is an addition that simplifies dynamic modifications to the selection screen.
DEFAULT addition enables you to set values for a PARAMETERS keyword with the addition of a default value. MEMORY ID, when assigned, enables the system to automatically retrieve and display the current value from the SAP memory. OBLIGATORY is an addition where you declare mandatory fields. The user cannot leave the selection screen until entries are made into these fields. VALUE CHECK ensures that entries are checked for validity, but only if there is a reference to a dictionary object that has a foreign key relationship. AS CHECKBOX is a parameter in which you create a one-character field that contains a “ ” (space) or “X”. You can evaluate the contents of the checkboxes in IF/ENDIF structures. RADIOBUTTON GROUP is a group of radio buttons for the selection screen. Only one radio button in a group can be active. You can evaluate the contents of radio buttons, using a CASE/ENDCASE control structure. The selected radio button has the value “X” and all others have the value “ ” (space). MODIF ID is an addition that simplifies dynamic modifications to the selection screen.
SELECTION WITH SELECT-OPTIONS

The SELECT-OPTIONS keyword is a declarative language element. It has the same eight-character naming restriction as PARAMETERS.
Unlike the PARAMETERS keyword, SELECT-OPTIONS permits a range of values and complex selections, instead of just a single input-ready field.
The SELECT-OPTIONS keyword generates an internal table with a standard structure and a header line.
This table has four columns:
Sign, which is an indicator meaning including or only Option, which is a relational operator Low, which specifies the lower limit High, which specifies the upper limit
The use of FOR with your statement helps specify the field against which the system should check selection entries.
Each line of the selection table formulates a condition using relational operators from Sign and Options.
SELECT-OPTIONS: POSSIBLE VALUES FOR SIGN AND OPTION
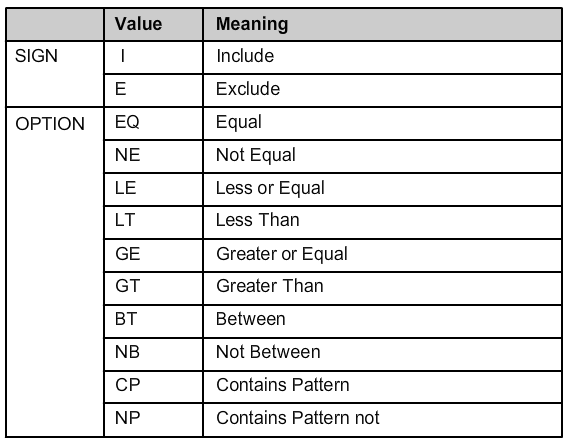
The internal table <seltab>, which is generated by using SELECT-OPTIONS, lists possible values for the columns SIGN and OPTION.
SELECT-OPTIONS WITH MULTIPLE SELECTION CRITERIA

The internal table is automatically populated when the user makes entries in a SELECT-OPTIONS object.
There is an (I)nclusive in the Sign column if the traffic signal icon is green duringSelect. A red light indicates (E)xclude.
SYNTAX OF THE SELECT-OPTIONS STATEMENT

The SELECT-OPTIONS statements include many additions:
DEFAULT enables you to set default values for the low, or low and high parameters. OPTION and SIGN can be used to set default values for Option and Sign, which differ from the normal default values added. MEMORY ID, if assigned, facilitates the retrieval and automatic display of the current value from the SAP system memory by the system. LOWER CASE suppresses conversion of the entry to upper case. This addition is not permitted for Dictionary fields, because the attribute set in the Dictionary takes precedence. OBLIGATORY generates a mandatory field. A checkmark is displayed in the entry field in the selection screen and the user should enter a value. NO-EXTENSION suppresses multiple range selections. NO INTERVALS suppresses the upper interval limit entry on the selection screen. You can use the Multiple selection screen to specify ranges or intervals.
ABAP EVENTS IN THE SELECTION SCREEN ENVIRONMENT

The event LOAD-OF-PROGRAM runs at the beginning of the program execution when the machine code is loaded to the main memory. The dynamic preassignment of input fields is not recommended at this point.
The event AT SELECTION-SCREEN OUTPUT runs immediately before the selection screen is displayed.
AT SELECTION-SCREEN runs immediately after the selection screen is displayed.
Since you can display the selection screen multiple times, the system can process these event blocks multiple times.
INITIALIZING THE SELECTION SCREEN

The INITIALIZATION event is processed once in each executable program. You can supply the default values for both the selection screen fields of a report and a logical database, during this event.
FILLING INTERNAL TABLES WITH HEADER LINES

The internal table with a header line generated by using the SELECT-OPTIONS actually creates two data objects: a table body named <sel_opt> and a work area (the header line), also named <sel_opt>. You can fill the work area with suitable values and then use the APPEND <sel_opt> command to add it to the table body as a separate line.
DESIGING THE SELECTION SCREEN I

You use the statement SELECTION-SCREEN BEGIN OF BLOCK and SELECTION-SCREEN END OF BLOCK to define the SELECTION SCREEN.
Screen elements that logically belong together can be grouped using the extension BEGIN OF BLOCK.
The WITH FRAME statement places a frame around the screen elements. Frames can be nested to a maximum depth of five.
The title can be declared as either text-<xxx> or as a field name of up to eight characters.
The text can be set at runtime in the INITIALIZATION event.
DESIGNING THE SELECTION SCREEN II

Multiple parameters and comments can be displayed in the same line on the screen.
To do this, enclose the parameters between the SELECTION-SCREEN BEGIN OF LINE and SELECTION-SCREEN END OF LINE statements. To include text in the line, use the COMMENT addition.
Comment text must always have a format consisting of position and output length. To set the position, you use an integer literal or pos_low and pos_high. The latter two are the low and high positions for the SELECT-OPTIONS field on the selection screen.
Adding COMMENT FOR FIELD ensures that F1 Help for the field is displayed for the comment text and the parameter.
The keyword POSITION is used to set the cursor for the next output position. It can only be used within BEGIN OF LINE and END OF LINE statements.
CALL SELECTION-SCREEN

The standard selection screen always has the number 1000.
To define additional selection screens, you use SELECTION-SCREEN BEGIN OF SCREEN <nnnn> and SELECTION-SCREEN END OF SCREEN <nnnn>.
CALL SELECTION-SCREEN <nnnn> is used to call this selection screen.
The event AT SELECTION-SCREEN is processed completely if there is any user action on the screen.
The system field sy-subrc contains 0 if the user chooses Execute or F8and the value 4 if the user chooses Cancel or Exit.
You can also call a selection screen as a modal dialog box, using
CALL SELECTION-SCREEN <nnnn>
STARTING AT <left_col> <upper_row>
ENDING AT <right_col> <lower_row>.
The coordinates of the top left corner of the screen are <left_col> and <upper_row>.
The coordinates of the bottom right corner are <right_col> and <lower_row>.
TABSTRIP CONTROLS ON THE SELECTION SCREEN

You must define three sections to include tabstrip controls:
A subscreen area on the selection screen to accommodate the tabstrip control The individual tab titles Selection screens as subscreens for individual tab titles
SELECTION SCREENS AS SUBSCREENS

Selection screens can be defined as subscreens, especially on tab pages. The system processes the ABAP events AT SELECTION-SCREEN OUTPUT and AT SELECTION-SCREEN for each subscreen, in addition to processing the surrounding selection screen.
A selection screen as a subscreen can be defined by
SELECTION-SCREEN BEGIN OF SCREEN <dynnr> AS SUBSCREEN [NESTING LEVEL <m> ][NO INTERVALS].
SELECTION-SCREEN END OF SCREEN <dynnr>.
The size of the subscreen can be further reduced by using NESTING LEVEL, to prevent scrollbars from appearing in a tabstrip control on the selection screen.
DEFINING TABSTRIPS ON THE SELECTION SCREEN

A subscreen area for a tabstrip control on a selection screen can be defined by SELECTION-SCREEN BEGIN OF TABBED BLOCK <blockname>FOR<n>LINES and SELECTION-SCREEN END OF BLOCK <blockname> .
The height of the subscreen area in lines is defined by <n>.
For individual tab pages, you can use more specific definitions:
SELECTION-SCREEN TAB (max_length) <name>
USER-COMMAND <ucomm>
[DEFAULT [PROGRAM <prog>] SCREEN <dynnr>]
TAB is the name of a variable containing the text to be displayed. You do not have to declare it, as it is a part of the tabstrip control.
You must also use the SCREEN addition while using the DEFAULT addition.
A <blockname>structure containing the fields, prog, dynnr, andactivetab is created automatically. It has the same name as the tabstrip block.
INPUT CHECKS: AT SELECTION SCREEN

The AT SELECTION-SCREEN event is where the screen input is evaluated. The system makes all the selection screen fields ready for input in case any error message or warning message is displayed during this event.
You can refer to specific selections by using the ON <f> bzw. ON <seltab> addition.
The event AT SELECTION-SCREEN ON BLOCK <block> is available for you to check entry combinations of a logical group.
GENERAL HELP AND INPUT HELP (F1 AND F4)

You can include the F1 Help (field help) and F4 Help (input help) for the events AT SELECTION-SCREEN ON HELP-REQUEST and AT SELECTION-SCREEN ON VALUE-REQUEST.
The F1 Help can refer to individual parameters or a selection table (seltab).
If you add ON VALUE-REQUEST, the button for the F4 input help for the corresponding field is displayed.
As a reference for an F4 Help, you specify either the lower interval field or the upper interval field.
SELECTION SCREEN: VARIANTS I

Variants are useful when you either start a program frequently with the same selection set, or execute it in the background. You can create any number of selection screen variants for a program, and it cannot be shared with other programs.
If the program uses several selection screens, you have the option of creating a variant for all the selection screens, or individually for each selection screen.
SELECTION SCREEN: VARIANTS II

You assign a name and a description to each variant. The variants are available – by default – for both online and background processing. You can also protect the variant itself, the individual selection criteria, and the parameters, against unauthorized changes.
By choosing Only Display in Catalog, the variant will only be displayed in the catalog and not in the general value help (F4).
The type of a selection is determined in its declaration (type S for SELECT-OPTIONS and type P for PARAMETERS). The field(s) will not be ready for input with the Selections protected option. The hideattribute does not display selections that are not required, resulting in a less cluttered selection screen.
You can supply values to your selection at runtime by using selection variables.
No comments:
Post a Comment