Global classes can be created using the context menu in the navigation area of Object Navigator. In the Object Navigator screen, select the package or directly select the class node within the package and choose Create.
Subsequently, a dialog box appears where you need to specify additional attributes. You should not make any changes to the default attributes at this point.
DEFINITION OF ATTRIBUTES
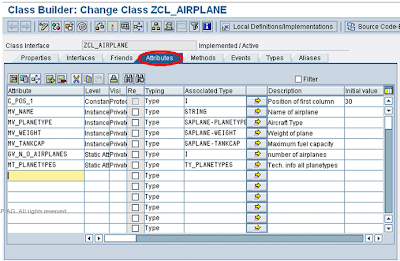
When a class description is specified, the control automatically takes you to the Class Builder screen, as shown here. The Attributes tab helps you to list the required attributes of the class. You can also define new attributes here and use the input help to define the type of attributes.
DEFINITION OF METHODS
The Methods tab contains a list of all the method definitions in the class. You can add new methods and give a brief description of each of these by using the input help. It is crucial to specify the signature for each method. This can be done with the help of Parameter button.
DEFINITION OF METHOD SIGNATURES
When you select a method and click the Parameter button, a screen appears to specify the desired parameters for that method.
In this example, IV_NAME and IV_PLANETYPE are the defined parameters for the CONSTRUCTOR method.
IMPLEMENTATION OF THE METHODS
There are two ways of carrying out method implementation. You can either double-click a method name from the method list, or select a method and click the Source code button. Subsequently, the control shifts to the screen shown here. The source code implementation for the method is defined here. The Signature button on the screen displays the parameters of the method.
DISPLAYING THE METHOD DEFINITIONS
In the header area of the Class Builder screen, choose Goto → Method definition to modify the number of attributes of a method. You can define the handler method using the attributes tab.
DEFINITION OF COMPONENT USING THE NAVIGATION AREA
You can define methods, attributes, and events in the Object Navigator’s context menu. You need to right-click the class name, and choose Create. After doing this, you can view the appropriate list of objects that can be created.
THE CLASS BUILDER TESTING ENVIRONMENT
To test an active global class, click the test icon in the initial Class Builder screen. An instance of the class needs to be created to test instance components. In the next screen, select the Instance button to create an instance of the class. You can execute the method by clicking the clock symbol, which appears as soon as the instance is generated.
SEPARATION OF NAVIGATION AND EDITING AREAS INTHE OBJECT NAVIGATOR
The navigation area and the editing area are two separate sections in the Object Navigator screen. You can view the Attributes and the Methods tabs in the navigation pane. You can use the ABAP Editor to make any changes in the objects in the navigation area.
OBJECT INSTANTIATION USING DRAG AND DROP
Drag a class name to the editing area by holding the left mouse button, in order to create an instance of the class in Object Navigator. The system automatically generates the CREATE OBJECT statement. You can then specify the reference variable and the parameters for the statement, if required.
METHOD CALLS USING DRAG AND DROP
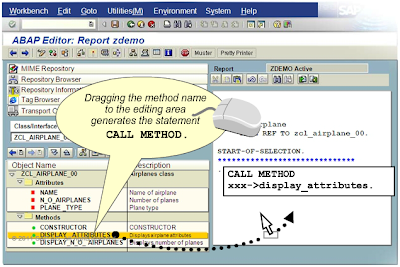
You can generate method calls using drag and drop approach. For this, select a method name from the navigation area and drag it to the editing area. This automatically generates a CALL METHOD statement. However, you need to specify both the reference variable and the actual parameters.
DEFINING AN INHERITANCE RELATIONSHIP
You can define the inheritance relationship for a global class by choosing the Properties tab in the Class Builder screen. The system also proposes for a Superclass. In this example, ZCL_AIRPLANE_00, is the superclass, and its properties are inherited in the subclass.
REDEFINING AN INHERITED METHOD
An inherited method can be redefined using the redefine button. When a method is redefined, the Superclass call appears as a comment.
DEFINING GLOBAL INTERFACES
Global interface is created in Object Navigator in the same way as global class. Right-click the interfaces in the navigation area. In the resultant dialog box, you can specify the name of the Interface and give a description. You must adhere to the naming conventions meant for user-defined interfaces.
INCLUDING GLOBAL INTERFACES
Once an interface is defined, it automatically appears in the appropriate Method tab with the specified name. As shown here, double-click a method name to define the implementation f a global interface. However, interfaces can also be included in a class by selecting the Interfaces button.
IMPORTING A LOCAL PROGRAM CLASS
You need to follow a simple procedure to import local classes into a global class:
/TAW12_Col92_en_TAW12_ABAP_Objects_and_Application_Areas/shell/assets/bullet.gif) Navigate to Class Builder using menu options or call transaction SE24.
Navigate to Class Builder using menu options or call transaction SE24./TAW12_Col92_en_TAW12_ABAP_Objects_and_Application_Areas/shell/assets/bullet.gif) In the Initial Screen, select Object type → Import → Local classes in programs. Enter the Program name, and if local classes and interfaces exist within the program, select Expand Includes.
In the Initial Screen, select Object type → Import → Local classes in programs. Enter the Program name, and if local classes and interfaces exist within the program, select Expand Includes./TAW12_Col92_en_TAW12_ABAP_Objects_and_Application_Areas/shell/assets/bullet.gif) Select Display Classes or Interfaces.
Select Display Classes or Interfaces./TAW12_Col92_en_TAW12_ABAP_Objects_and_Application_Areas/shell/assets/bullet.gif) Specify names for the global classes and interfaces that you want to create with the proper naming convention.
Specify names for the global classes and interfaces that you want to create with the proper naming convention./TAW12_Col92_en_TAW12_ABAP_Objects_and_Application_Areas/shell/assets/bullet.gif) Select the global classes and interfaces and click the Import button.
Select the global classes and interfaces and click the Import button.GENERATE A UML DIAGRAM FOR A PACKAGE
To view the UML diagram for your package, right-click the package name, select Display, and then select UML Class Diagram.
DEFINING A LOCAL TYPE
Local class or interface can be defined in a global class using Types. The components of the global class can access this local class or interface. However, they cannot be accessed from outside.
STRUCTURED DISPLAY OF INHERITED COMPONENTS
Click the Group by button to view the components of a global class in a structured format. Select the Group by interfaces and superclasses option to get the desired result.
SORTING THE COMPONENT DISPLAY OF GLOBAL CLASSES
The components can be sorted using the Sort button. You need to select the sorting criteria from the dialog box that appears. This shows the desired result.
SEPARATING THE NAVIGATION AND EDITING AREAS OF THE OBJECT NAVIGATOR
Global classes and interfaces are also included in the navigation area of the Object Navigator screen. Double-click an object name to edit it in the editing area.
OBJECT INSTANTIATION USING DRAG AND DROP
An instance of the class is created in Object Navigator. Drag the class name to the editing area. The system automatically generates the CREATE OBJECT statement. If required, the user specifies the reference variable and the parameters.
METHOD CALLS USING DRAG AND DROP
When you select a method name from the navigation area and drag it to the editing area, the CALL METHOD statement for that method is automatically generated. However, the reference variable and the actual parameters need to be specified.
WORKING WITH THE REFACTORING ASSISTANT
The existing repository objects can be modified using Refactoring Assistant. As shown in this example, Refactoring Assistant can be used to move the components of a class within the inheritance hierarchy.
____________________________________________________________________________
ABSTRACT CLASSES AND ABSTRACT METHODS
You can use the keyword, ABSTRACT, to withhold a class from being instantiated. The syntax used for this is CLASS class_name DEFINITION ABSTRACT.
Methods of an abstract class can be of type abstract. This means that their implementation is not defined.
FINAL CLASSES AND METHODS.
The FINAL addition in a class definition prevents it from being inherited. The syntax followed is CLASS class_name DEFINITION FINAL. All the methods of a final class are by default final in nature, which means they cannot be redefined.
READ TO A TABLE WITH OBJECT REFERENCES
Object references that are similar in nature are stored in internal tables with key information. These references can be easily retrieved using this key information.
READ ACCESS USING PUBLIC ATTRIBUTES
When information is stored in an internal table with key values, the key attributes are specified as public with the READ ONLY addition to avoid redundancy. These public attributes can be directly accessed when internal tables are accessed. The keyword, TABLE_LINE, is used when the line type of an internal table is of elementary data type.
NAVIGATION METHODS AND CHAINING OF METHOD CALLS
Association implies that at runtime an instance of one class can store references to the objects of another class. In this example, lcl_vehicle and lcl_rental are the classes associated through the navigation method, get_vehicle. Initially, it was necessary to store the reference to the new object in a reference variable. Now, with the release SAP NetWeaver 7.0 EhP 2, we can chain method calls. Therefore, it is now possible to call a method of the object returned by the navigation method.
INSTANTIATION: VISIBILITY SECTIONS
The visibility of the instance constructor can be controlled, which means that the CREATE OBJECT statement used to instantiate this class is also restricted to specific areas.
/TAW12_Col92_en_TAW12_ABAP_Objects_and_Application_Areas/shell/assets/bullet.gif) If the instance constructor is PRIVATE, then it can be instantiated only within the class.
If the instance constructor is PRIVATE, then it can be instantiated only within the class./TAW12_Col92_en_TAW12_ABAP_Objects_and_Application_Areas/shell/assets/bullet.gif) If the instance constructor is PROTECTED, then it can be instantiated by all the subclasses.
If the instance constructor is PROTECTED, then it can be instantiated by all the subclasses./TAW12_Col92_en_TAW12_ABAP_Objects_and_Application_Areas/shell/assets/bullet.gif) If the instance constructor is PUBLIC, then it can be instantiated anywhere.
If the instance constructor is PUBLIC, then it can be instantiated anywhere.IMPLICIT SETTING OF THE INSTANCE CONSTRUCTOR'S VISIBILITY
The example shown in the slide gives a syntactical representation of the visibility concept. The visibility of the instance constructor is implicitly defined as PUBLIC, PRIVATE, and PROTECTED using the keyword, CREATE, in the class definition.
EXAMPLE FOR A CLASS WITH FACTORY METHOD
In this example, the class, lcl_airplane, keeps a reference of all its instances in a static attribute. The instantiation is permitted within the class itself and can only be done in static METHOD factory. When the method is called, it first checks if an identical instance already exists. If it does, then it returns the existing instance, instead of creating a new one.
SINGLETON CLASS 1: USING A FACTORY METHOD
Singleton class is a special case of the factory concept, wherein the class stores only one instance. The class is instantiated on the first call of the factory METHOD, get_instance. For all the future calls, only the reference of the existing object is returned.
SINGLETON CLASS 2 : USING THE STATIC CONSTRUCTOR
As shown in this slide, the class, lcl_singleton, makes use of a static constructor to create an instance. The get_instance method no longer creates an instance, but only returns the reference of an already existing one.
DEFINITION OF A FRIENDSHIP RELATIONSHIP BETWEEN CLASSES
A class can access the protected and private components of another class using the friendship concept. Syntactically, a class can become a friend of another class using the keyword, FRIENDS. Friendship is a one-sided relationship. In this example, the class lcl_2 is able to access the private attributes of the class lcl_1 after declaring it as a friend.
EXAMPLE OF A FACTORY CLASS
In this example, the public static method, create_airplane, either instantiates the class lcl_factory or returns a reference to an instance that already exists.


